Proctoring Post-reviewed exams
Read this section for the information on how to proctor exams with Post-exam review proctoring.
What is post-exam proctoring?
Post-exam proctoring is the process of reviewing recorded exam sessions to ensure compliance with exam rules. Unlike live proctoring, post-exam proctoring focuses on one test taker at a time.
The process works as follows:
- While a test taker takes a test, their screen, webcam and microphone are recorded by Constructor Proctor. The recorded session is uploaded to our server and saved in the Archive.
- A proctor opens the Archive menu and selects a session for review.
- The proctor uses a log of AI-generated warnings to find and check moments of suspicious behavior in the session as follows:
- If the AI missed a potential rule violation, the proctor manually adds a warning.
- If the session contains too many warnings, the proctor sets its status to Declined.
- If the exam was taken fairly, the status is set to Approved.
Now let’s break down the post-exam proctoring process step by step.
Finding an exam session to proctor
- Open the link to the proctoring app sent by your administrator.
- Sign in with proctor credentials:
- Open Archive:

- Find the session to proctor using the Search field. For example, you can enter the examinee's name or their email address:

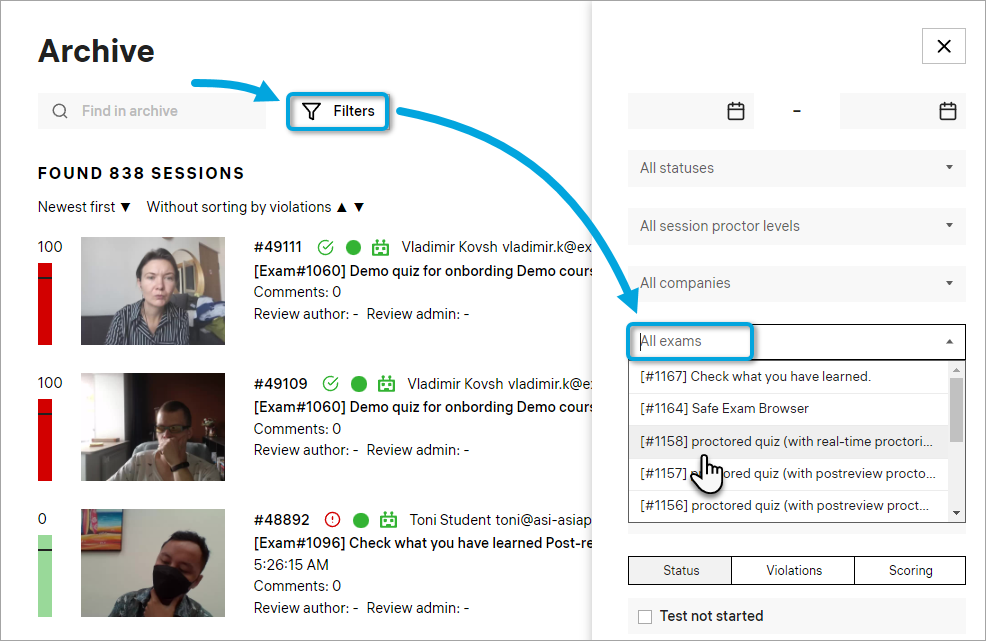
💡 The Archive gives you access to all exam sessions (including real-time ones) recorded in the past.- You can use filters to narrow down the search. For example, you can set a certain exam as a filter to only display sessions from this exam:
💡 Videos take time to be processed on our server. Usually, they will appear in the archive 1-10 minutes after the exam was finished.
- You can use filters to narrow down the search. For example, you can set a certain exam as a filter to only display sessions from this exam:
- Click the video thumbnail or the session number to open the recording:

This will bring up the post-exam proctoring interface:

It allows you to identify the examinee, watch their webcam and screen-sharing videos in sync, review AI-detected alerts, manually add warnings, mark violations, and set the review status to either “Approved” or “Declined”.
Identify examinee
First, you need to identify the person in the session. Click on the ID photo taken by the examinee and compare their name on the document with their name on the platform (above the photo):

If the names don’t match, scroll the page down, check the corresponding option, and set the review status to “Declined”, then click Send:
If the names do match, proceed to the next step.
Proctoring process
Exam rules
Check the exam rules so that you know what actions are allowed (1) and what are prohibited (2) for the examinee:
If you hover the cursor over one of the icons, you will see a tooltip with a description of the rule:
After checking the exam rules, you can start watching the session.
Exam video
There are two videos in each exam session – a recording from webcam and a screen-recording. They are in sync – you can see the examinee and what is displayed on their monitor at any moment during the exam.
- Start playback:

You can also start playback by left-clicking on one of the videos or pressing the Spacebar. - Move the playhead to seek through:

💡 You can seek in 2-second increments by pressing Left or Right on your keyboard. - To increase playback speed, use the 1x-10x slider:

- To zoom in on a video, right-click on it:

Right-click on the video again to minimize it.
Warnings
Manual warnings
When you catch the examinee misbehave, pause playback to add a warning:
- Click Add warning:

- Select the appropriate warning type from the list:

- Click Send:

The warning will now be displayed in the session log with a timestamp:
Now other proctors will see this warning when they review the session.
Delete a warning
If you added a warning by mistake, you can always delete it – point the cursor to the right from the manually-added warning and click Remove:
AI-detected alerts
- Our AI analyzes each exam session and saves detected alerts into the session log. In order to see these alerts, click the corresponding option:

- AI-detected alerts will be displayed in the log with this icon:
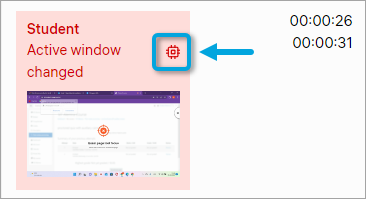
- To fast-forward the video to 5 seconds before the event that triggered the AI alert, click on its starting time:

- To confirm an AI-detected alert, click the corresponding button:
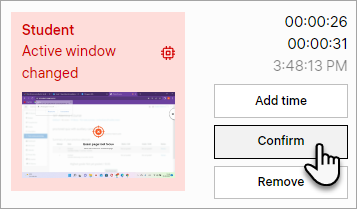
Confirming AI-detected alerts will make them appear in the Confirmed by Proctor list.
Set the status
When you watched the entire session and added warnings for all accounts of misbehavior, you’re ready to submit the proctoring review. This review will determine whether the student’s exam score can be trusted or not.
- Scroll the page down to see Status detection in post proctoring:

- If you counted 3 or more warnings of the same type, mark the corresponding box in the list:

It can be a different number of warnings depending on your approach to proctoring. Just make sure that all of your proctors are using the same grading system in session review. - Set the review status to Declined and click Send to save the changes:

If the examinee did not misbehave during the session, select the Approved status and click Send.
Now you can go back to the archive and proceed with the next session to review it.